Wizard correction
Inside the deflicker mode, this is a utility that automatically corrects brightness variations generated during a session in which some parameters (for example, exposure time or aperture) are changed (for example, with software or utility type Magic Lantern or others)
Before using this utility, it is necessary to calculate the brightness of each frame by pressing the button Brightness Calc.
The parameters for using this utility are just two:

Difference to create keyframes and Output adjustment.
The utility to properly calculate the corrections to suggest, use the Key frames. These are generated in an automatic way.
The parameter difference to create Keyframes is used to tell the program when to create a keyframe exploiting the difference in brightness between two successive frames.
If this difference is greater than the set value, then the program will create a keyframe.
The parameter Correction Output is used to Amplify or reduce the magnitude of the correction. Depending on the subject of the photo, you may want to change this parameter.
Depending on the difference in brightness between two adjacent frames, you should set different values.
If in the sequence are present fluctuations of brightness greater than 10 units is advisable to lower this value to 0.5
If instead we have a maximum difference around 5 units is advisable to lower this value to 0.6
Will now simply press the button Wizard  . The program will automatically create all the necessary keyframes. Also compute a linear interpolation between the values of two keyframes in such a way that the brightness present in the first keyframes is gradually brought to the brightness of the next keyframe.
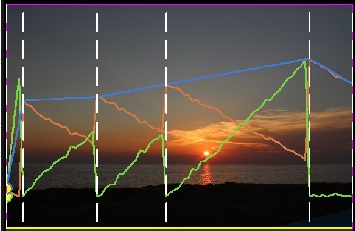
In the following example, you can see the trend of the blue line.
As you notice, the brightness trend is modified in such a way that you will pass by a value in the first keyframe to the value in the next keyframe and then from there to the next keyframe yet. We note the initial part of the graph. If, as in the case shown here, in a few frames will have a remarkable change in brightness, it is recommended (if the number of pictures is sufficient) to discard this first part.
Same thing for the final part. Here is advisable to make a last photo with a change of aperture and exposure time.
The program in the Preview box also draws a graph that has the following information:
The line red / orange is the trend of the brightness of the original photos
The green line is the trend of the suggested fixes (must look very much like the inverse of the previous year)
The blue line, however, indicates that the trend should take the brightness after the correction has been applied.
After making operation deflick, we can use the preview function provided by the program.


