Crop/Pan/Zoom
This mode allows you to change the frame size. Making this change, you can select only a portion of the image (Crop). If this amendment moves in space, we can simulate camera movement (horizontal Pan / Tilt vertical). If this change also involves a change in the dimensions of the framed it has an effect zoom.
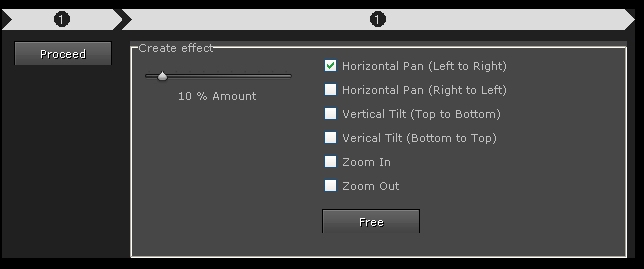
Entering this mode, the program offers the following commands:

With the Proceed, the program calculates all the intermediate points between two keyframes set. In case no keyframe has been defined, the program simulates the creation of a first Keyframes corresponding to the first frames and a second Keyframes corresponding to the last frames.
If for example the sequence is made up of 10 frames and the first frames has a CropLeft = 10 and the last frames has a CropLeft = 100, the program changes in an automatic way the CropLeft of frames from 2 to 9 with values ranging from 20 to 90 with step 10.
The results of these operations can be seen in the list below

In the “Create effect”, the program allows you to create automatically (ie, no need to set up Lightroom the start and end position of the crop) some camera movement. You can change the amount of movement by setting the appropriate percentage. This indicates in practice than (in percentage compared to the size of the frame) will be the movement. You can simulate events both horizontal and vertical zoom, and also the sense of movement.
You can see a “preview” of the effect obtained.
The program also allows you to create free movement. To do this you must press the button Free . Pressed, the screen will change to:

Here, using the mouse, you can draw boxes that determine the simulated movement. To do this, stand on the first frame, draw the box, move to the last frame and draw the frame arrival.
The program automatically creates the necessary keyframes and tweens movements.
The boxes are designed to maintain a 16:9 aspect. If you want you can release this ratio by removing the flag in the box.
Once you have defined the starting points and end points (but you can also add points), press Exit to exit this setting.
You can also change these values manually. To do this you need to move to the desired frame in the list, and press the edit button. This will open a window where you can put the data in hand.
The program, in the preview pane shows (via an orange rectangle) the area of the frame resulting from the operation of crop. Selecting a frame at a time you will see the box move.
You can also have another type of preview. Under the player (in the preview) there is a checkbox where you can tell the program to show the effect applied (if flagged). After putting a check mark in this checkbox, simply press the play button. The program will render the various images using the crop.
Once you have viewed the effects, if they are to our liking, we can make them effective by pressing the button Save XMP.
In this way, the program overwrites the data in the xmp file.


